How to Roll a Bike Chain?
We refer here to the previous animation tutorial on 'Roller Chain'!
For details on how to make an animation of a roller chain see here: How to make a Roller Chain.
For more detailed information on the geometry see here: External Tangents to two Circles.
With bike chains we have two additional problems: There are two kind of links and the pitch is a given value.
How to use Alternating Chain Links?
First we must have an even number of links!
Than we replace our formar declaration of 'Link' by something like these two links:
// --------- the chain links ----------
#declare Link_0 =
sphere{ <0,0,0>,0.0075
        pigment{ color rgb<1,0.75,0>}}
#declare Link_1 =
sphere{ <0,0,0>,0.010
        pigment{ color rgb<0.7,1,0>}}
//------------------------------------- |
Than we need to alternate between these two links
inside the loop, but before placing the links:
// --------- alternating links --------
union{ //------------------------------
#local Nr = 0; // start loop
#while (Nr < Link_N)
 #local Pos = mod(Nr*Link_L+Ani,C_Len);
 #if( Nr/2 = int(Nr/2))// even numbers
   #local Link = object{ Link_0)};
 #else  // odd numbers
  #local Link = object{ Link_1 };
 #end //
// .... continue with loop .... |
How to Adapt a Chain to a Given Pitch?
Until now the pitch (= length of the links from axis to axis) was calculated automaticly.
If we want to insert chain links with a given pitch, we need to adapt the number of links
and/or the geometry of the chain belt (radii of the sprocket wheels and/or distance of their axes).
Now here is
a Method for Adapting the number of links
and/or the geometry of the sprocket wheels to a given pitch length:
Because of the redish part in the following text, we
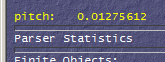
can run the file and read on the message page of POV-Ray something like this:
By POV-Ray calculated pitch value
If this value does not fit to our wanted pitch size we should adapt our geometry or the used (even!) number of links.
(For demonstration we use the macro Bike_Chain_Link_1)
// -------------- dimensions -----------
#local R1 = 0.08;  // big wheel radius
#local R2 = 0.04; // small wheel radius
#local Dist = 0.25;// axis distance
#local Link_N = 72;// number of links
// -------------- calculations ---------
 ... like here:
  'How to Make a Roller Chain'.
//--------------------------------------
#debug concat( "\n","pitch: ",
               str(Link_L,12,8),"\n" )
#declare Real_Pitch = 0.01275612; //
//--------------------------------------
#include "Bike_Chain_Link_1.inc"
#macro CLink (LinkType_) // 0 or 1
object{ Bike_Chain_Link_1(
    LinkType_,// 0= inner, 1= outer link
    0.0127, // pitch, axis to axis
    0.0051, // link radius y
    0.0081, // cut radius
    0.0032, // roller radius
    0.0106, // link width z
    0.0009, // steel thickness
    0.0003, // tween thickness
    0.00013,//  border radius
  ) // -----------------------
  scale Real_Pitch/0.0127
 } // ----------------------------------
#end //-------------------- end of macro
//--------------------------------------
#local Ani=clock*Link_Len;// animation!
union{ //-------------------------------
#local Nr = 0; // start loop
#while (Nr < Link_N)
 #local Pos = mod(Nr*Link_L+Ani,C_Len);
   #if(Nr/2 = int(Nr/2)) // even numbers
         #local Link = object{CLink(0)};
   #else //                 odd numbers
         #local Link = object{CLink(1)};
   #end //------------------------------
 //-------------------------------------
 ... The rest of the loop like here:
     'How to Make a Roller Chain'.
|
|
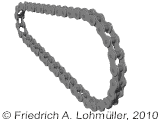
A chain with two different links!
Animated chain with alternating links.
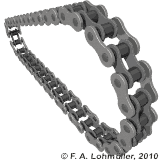
A bike chain consists of two type of links!
Bike chain
Scene descriptions for POV-Ray:
"Bike_Chain_1.ini",
"Bike_Chain_1.pov" and
here used: "Bike_Chain_Link_1.inc"
Bike chain animation with POV-Ray
Bike chain + sprocket wheels
animation with POV-Ray
For animations on rolling bike chains look here:
3D-Animations - Engineering.
|