Geometria di Base del Tetraedro Regolare
usato qui :
Per più dettagli si può vedere Geometria del Tetraedro Regolare.
Della lunghezza di lato "Side_a" di un tetraedro possiamo calculare
il raggio della circumsfera:
R_circum = sqrt( 3/8 ) * Side_a;
et l'angolo entro vertice, centro e vertice:
Vertex_Center_Vertex_Angle = degrees(acos(-1/3)); (~ 109.471).
Cominciamo con la dichiarazione della lunghezza del lato di tetraedro "Side_a":
#declare Side_a = 1;
#declare R_circum  = sqrt( 3/8 ) * Side_a;
#declare Vertex_Center_Vertex_Angle = degrees( acos( -1/3 )); |
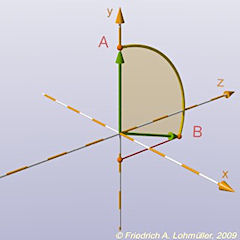
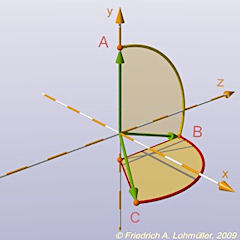
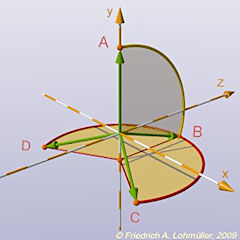
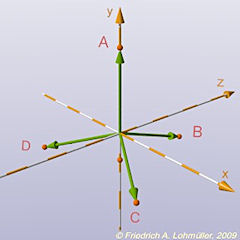
I vettori V1,V2,V3,V4 di <0,0,0> ai vertici A,B,C,D:
// caculation of the vectors --------------------------------
#declare V1 = <0,R_circum,0>;
#declare V2 = vrotate( V1,< Vertex_Center_Vertex_Angle,0,0>);
#declare V3 = vrotate( V2,< 0, 120, 0>);
#declare V4 = vrotate( V2,< 0,-120, 0>);
//----------------------------------------------------------- |
Per rappresentare i simboli dei vettori usiamo la macro seguente:
//---------------------------- macro Vector(Start,End,Radius)
#macro Vector(P_s,P_e, Rv)
union{
cylinder{ P_s, P_e - (vnormalize(P_e - P_s)*9.5*Rv), Rv }
cone    { P_e - (vnormalize(P_e - P_s)*10*Rv), 3*Rv, P_e,0}
}// end of union
#end //----------------------------------------- end of macro |
Alternativo: #include "analytical_g.inc"
per disegnare i vettori ai vertici:
#declare Vector_Texture =
 texture{ pigment{ color rgb<0.2,0.5,0.0>}
          finish { phong 1} }
#declare Rl = 0.01; // line radius
// vectors --------------------------------------------------
object{ Vector( o,V1, Rl) texture{ Vector_Texture }}
object{ Vector( o,V2, Rl) texture{ Vector_Texture }}
object{ Vector( o,V3, Rl) texture{ Vector_Texture }}
object{ Vector( o,V4, Rl) texture{ Vector_Texture }}
//----------------------------------------------------------- |
Se dichiaramo i testuri corrispondenti in modo analogo possiamo disegnare
i vertici, gli spigoli e i faccie:
#declare Corners_Texture =
 texture{ pigment{ color rgb<0.75,0.1,0.0>}
          finish { phong 1} }
#declare Edge_Texture =
 texture{ pigment{ color rgb<1,0.5,0.0>}
          finish { phong 1} }
#declare Surface_Texture =
 texture{ pigment{ color rgbt<0.3,0.7,0.0, 0.75>}
          finish { phong 1} }
#declare Rp = 0.025; // 'point' radius
// corners ------------------------------------------
sphere{ V1, Rp texture{ Corners_Texture } }
sphere{ V2, Rp texture{ Corners_Texture } }
sphere{ V3, Rp texture{ Corners_Texture } }
sphere{ V4, Rp texture{ Corners_Texture } }
// edges --------------------------------------------
cylinder{ V1, V2, Rl  texture{ Edge_Texture } }
cylinder{ V2, V3, Rl  texture{ Edge_Texture } }
cylinder{ V3, V1, Rl  texture{ Edge_Texture } }
cylinder{ V1, V4, Rl  texture{ Edge_Texture } }
cylinder{ V2, V4, Rl  texture{ Edge_Texture } }
cylinder{ V3, V4, Rl  texture{ Edge_Texture } }
// surfaces------------------------------------------
triangle{ V1, V2, V3 texture{ Surface_Texture } }
triangle{ V1, V2, V4 texture{ Surface_Texture } }
triangle{ V2, V3, V4 texture{ Surface_Texture } }
triangle{ V3, V1, V4 texture{ Surface_Texture } }
//--------------------------------------------------- |
|
Passo 1: ruotare VA intorno all'asse x con 109.47°.
Passo 2: ruotare VB intorno all'asse y con +120°.
Passo 3: ruotare VB intorno all'asse y con -120°.
I vettori dei of the corners of the tetrahedron.
Descrizione della scena per POV-Ray:
"Regular_Tetrahedron_Vectors_1.pov" o
"Regular_Tetrahedron_Vectors_1.txt"
|