Home
- POV-Ray Tutorial
- POV-Ray Examples
Index of Content
- Geometry
- Architecture
- House
- Roof
- Tower
- Castle
- Window + Door
- Stairs
- Pyramid
- Columns
- Arch
- Fences
- Furnitur
- Household
- Engineering
|
|
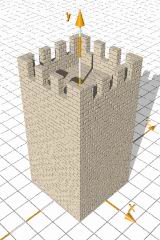
Tower with Battlements
This How To shows the construction of a tower with battlements.
It's made from a rough shape by subtracting ("difference{...}) the gaps
of the battlements.
To keep things more flexible for changes in design, all
textures and dimensions are declared as variables (wildcards) at the head
of the scene file.
To get clean results while using "difference"
the shape which we want to subtract has to have unambiguous surfaces outside of
the shape from which we want to subtract him.
To get this easyly we use the variable
"D = 0.0001" - just a little bit! So we can say "+D"
= "just a little bit more" or "-D" = "just a little bit less"!
To get a better visibility of the parts, which we subtract,
we choose a second texture with green color. Later we can change it
easy by moving the comment signs "//".
An include file to use this object as a read-made object you can find
at my POV-Ray Objects page.
|
How To Do:
First we declare the textures and the dimensions:
#declare Tower_Texture_1 = // sandstone
 texture{ pigment{ color rgb<0.9,0.78,0.6>}
          normal { bumps 0.5 scale 0.015 }
          finish { diffuse 0.9 phong 0.1}
        } // end of texture
#declare Tower_Texture_2 =//darker sandstone
 texture{ pigment{
     // color rgb<0.9, 0.78, 0.6>*0.95}
        color rgb<0.4,1,0.0>} // test_color
          normal { bumps 0.5 scale 0.015 }
          finish { diffuse 0.9 phong 0.1}
        } // end of texture
//-----------------------------------------
#declare D = 0.0001; // just a little bit
#declare Tower_R = 2.00;// half width x, z
#declare Tower_H = 8.00;// tower heigth in y
// Mark 1
//-----------------------------------------
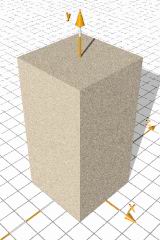
Than we need a rough shape of our tower:
// tower base shape
box{ <-Tower_R,       0,-Tower_R>,
     < Tower_R, Tower_H, Tower_R>
     texture{ Tower_Texture_1 }
   } // end of box
//-----------------------------------------
|
Tower rough shape
|
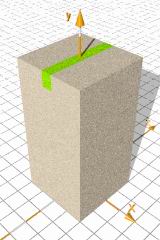
Then we have to define the size of the gaps in the battlements.
We start here from towers top down.
#declare Bments_H = 0.80;// battlements height y
#declare Bments_R = 0.20;// battlements half width x , z
//-----------------------------------------
#declare Merlon_Cut_Off =
box { <-Bments_R,-Bments_H,-Tower_R-D>,
      < Bments_R,        D, Tower_R+D>
      texture { Tower_Texture_2 }
    } // end of box
//-----------------------------------------
To subtract this from rough shape of the tower we have to
insert this befor "// tower base shape" at "Mark 1".
|
Merlon cut off shape
|
To check the position and size we add behind our rough shape:
object{ Merlon_Cut_Off
        translate<0,Tower_H,0> }
... everything okay? Then try this ...
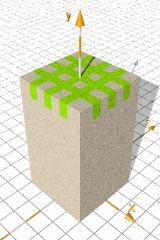
union{ //  union of the merlon cut offs
  object{ Merlon_Cut_Off
          translate<-2*Tower_R/4,0,0>}
  object{ Merlon_Cut_Off
          translate< 0*Tower_R/4,0,0>}
  object{ Merlon_Cut_Off
          translate< 2*Tower_R/4,0,0>}
  object{ Merlon_Cut_Off
          translate<-2*Tower_R/4,0,0>
                       rotate<0,90,0>}
  object{ Merlon_Cut_Off
          translate< 0*Tower_R/4,0,0>
                       rotate<0,90,0>}
  object{ Merlon_Cut_Off
          translate< 2*Tower_R/4,0,0>
                       rotate<0,90,0>}
  translate<0,Tower_H,0>
} // end of union of the merlon cut offs
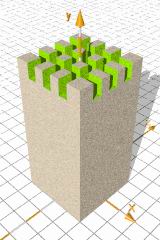
|
6 Merlon cut off shapes
|
If we put this inside a difference with the rough shape like this:
#declare .... // textures
#declare ... // dimensions
#declare Merlon_Cut_Off = ....
// all things to declare
// than:
difference{
 // tower base shape:
 box{...
    } // end of box
 // things to subtract:
 union{ //  union of the battlements cut offs
  object{ ...
        }
  ....
  object{ ...
        }
  translate<0,Tower_H,0>
 }// end of union of the battlements cut offs
}// end of difference
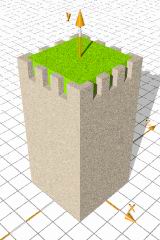
...than we should get what you see here at the right:
|
subtracted
|
Now we have to cave out the inside of the balustrade at the highest level:
// inside top level balustrade caved out
#local Balu_H = 1.50; // height
#local W_D = 0.30; // wall deepth

box { <-Tower_R+W_D,-Balu_H,-Tower_R+W_D>,
      < Tower_R-W_D,      D, Tower_R-W_D>
      texture { Tower_Texture_2 }
      translate<0,Tower_H,0>
    } // end of box
|
Cave out the center.
|
|
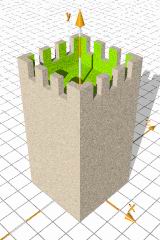
If we put this shape also inside the parentheses of our difference
then we get the following shape:
|
Center caved out.
|
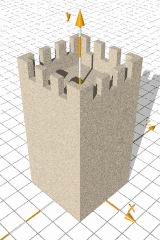
How To Make a Realistic Wall Texture
With a simple texture like this
#declare Tower_Texture_1 = // sandstone
 texture{ pigment{ color rgb<0.9,0.78,0.6>}
          normal { bumps 0.5 scale 0.015 }
          finish { diffuse 0.9 phong 0.1}
        } // end of texture
we can't see the stones in the walls!
|
Sandstone
without interstices.
|
For a simulation for a wall of stones with interstices we can use
the POV-Ray bricks pattern:
#declare Tower_Texture_1=// sandstone
texture{
  pigment{ color rgb<0.9,0.78,0.6>}
  normal {
    pigment_pattern{ brick
                     color rgb 0.2,
                     color rgb 0.8
                     scale 0.135
                     translate<0,0,0>
                     rotate<0,0,0>
                    } // end pattern
             0.35 // normal intensity
          } // end of normal
   finish { diffuse 0.9 phong 0.1}
 } // end of texture
|
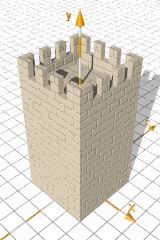
Sandstone
with interstices.
|
Problems with the "bricks" pattern.
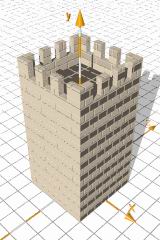
With a bricks pattern you often will get images like here at right side.
The reason for getting such dark and light rows of bricks is here, that
we hit the mortar zone of the brick pattern with our wall.
To avoid this and to create also smaller or bigger stones we have to
scale, translate and/or rotate the pigment_pattern accordingly.
|
typical
brick error
|
|
The Adaption of the level of the interstices with the height and width of the
merlons is a very difficult work which rarly ends totally correct.
The result of this simple simulation of a stonewall however is very remarkable,
specially compared to the minimal efford.
|
Click on the thumbnail
for a higher resulution
|
Ready-made POV-Ray objects as
include files and example files you'll find
at the POV-Ray Objects Page
|
