Home
- POV-Ray Tutorials
POV-Ray Introduction
Content - INDEX
1. Working with POV-Ray:
"Insert Menu Add-on".
2. Basics on
How To Make a Scene.
3D Coordinates,
Floats and Vectors
3. Scene Structure
Basic example.
4. Scene File Header,
#include files,
camera, light_source.
5. Basic Geometric Objects
sphere, box, cylinder,
cone, torus, plane.
and other shapes
6. Transformations
Streching, Turning,
Moving and others.
CSG: union,
difference, intersection.
7. Colors on Surfaces
texture, pigment, normal, finish
8. #declare, #local, #macro,
placeholders + flexible objects.
>9. #while Loops
Basic examples.
10. #include, include files,
re-usable objects.
11. Efficiency,
speed, flexibility,
modulare working
adapting from 3.1 to 3.5;3.6
adapting from 3.5;3.6 to 3.7
POV-Ray + Windows Vista.
- Insert Menu Add-on
& Download
|
#while - Automatic Serial Production by Loops
With this mechanism it is possible, like in every modern programming language,
to do automatic serial productions
in a very simple way.
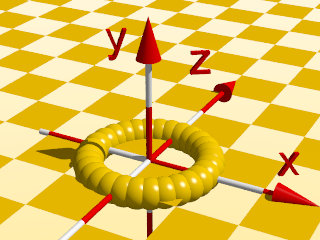
Here is an example:
#declare Nr = 0; // start
#while ( Nr < 30 ) // as long as Nr < 30,
  //do the following commands:
  sphere{<1,0,0>,0.25
         rotate<0,Nr * 360/30 ,0>
         texture{
             pigment{ color rgb<1,0.65,0>}
             finish { phong 1.0}
            } // end texture
         } // end sphere
  #declare Nr = Nr + 1; // next
#end // ------- end of loop |
|
A full circle of 30 spheres (Nr.0 to Nr.29)!
Scene file for POV-Ray:
While_demo1.pov
|
Here is another example:
#declare CH = 3.0; //column height
#declare Column =
union{
 cone{<0,0,0>,0.40,<0,CH,0>,0.30}
 torus{0.4,0.05 translate<0,0.05,0>}
 torus{0.3,0.05 translate<0,CH-0.05,0>}
 texture{ pigment{ color rgb<1,0.95,0.8>}
          normal { bumps 0.5 scale 0.01}
          finish { phong 0.1 }
        } // end of texture
 }// end Column
//--------------------------------------
union{ //-------------------------------
 #local Nr = 0;     // start
 #local EndNr = 10; // end
 #while (Nr < EndNr)
  object{ Column translate<-2,0,Nr*2.5>}
  object{ Column translate< 2,0,Nr*2.5>}
 #local Nr = Nr + 1;  // next Nr
 #end // --------------- end of loop
rotate<0,0,0>
translate<0,0,0>
} // end of union ----------------------- |
Attention: It's up to the user to avoid endless loops!
|
|
Further examples and more detailed explanations, see: "About While-Loops with POV-Ray"..
|
|