Home
- POV-Ray Tutorials
POV-Ray Introduction
Content - INDEX
1. Working with POV-Ray:
"Insert Menu Add-on".
>2. Basics on
How To Make a Scene.
3D Coordinates,
Floats and Vectors
3. Scene Structure
Basic example.
4. Scene File Header,
#include files,
camera, light_source.
5. Basic Geometric Objects
sphere, box, cylinder,
cone, torus, plane.
and other shapes
6. Transformations
Streching, Turning,
Moving and others.
CSG: union,
difference, intersection.
7. Colors on Surfaces
texture, pigment, normal, finish
8. #declare, #local, #macro,
placeholders + flexible objects.
9. #while Loops
Basic examples.
10. #include, include files,
re-usable objects.
11. Efficiency,
speed, flexibility,
modulare working
adapting from 3.1 to 3.5;3.6
adapting from 3.5;3.6 to 3.7
POV-Ray + Windows Vista.
- Insert Menu Add-on
& Download
|
Basics on How To Make a Scene
|
To describe a scene for POV-Ray we use texts of
keywords and values,
that must be written very carefully!
A comma or a bracket at the wrong place is likely to mess up the whole scene or make it impossible to render.
The program is case-significant, which means that it considers capitals and small letters as different
characters! Also, don't use specific national characters outside of comments or in file names!
The parser (= the part of the program that translates the written statements into mathematical formulas)
reads the text from top to bottom, just like a cook reads a cooking instructions.
Don't use abbreviations before you have declared them!
You may not divide keywords by spaces, but
sometimes keyword must be separated by spaces from their according values!
I.e. "scale2" is an error, but "scale 2" is ok!
Multiple spaces and CR/LF between keywords are ignored.
After the characters // you may write comments and remarks also using any specific national
character sets, the rest of the line will be ignored.
Longer comments spread over more then one line must use the sequences /* ("start of comment") and */
("end of comment").
|
xyz-Coordinates and Vectors
|
POV-Ray normally uses a so-called "left handed" coordinate system.
The three-dimensional coordinates for the directions x, y and z are defined relatively to each other as follows:
x to the right positive following your thumb - horizontal
y to up positive following your index finger - vertical
z forward positive following your middle finger - away into of the depth of the space
|
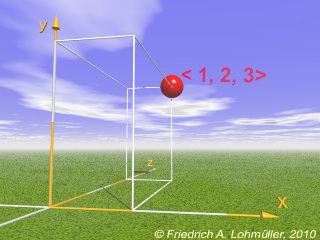
The "left handed"
coordinate system
|
Position: <1,2,3>
coordinates: x = 1, one unit to the right,
y = 2, two units up,
z = 3, three units forward.
|
Angles: "rotate<Xrot,Yrot,Zrot>"
rotation is counterclockwise, if looking in the positive directions of the axes!
(left thumb rule)
|
Attention: All relative expressions like "right", "up" and
"left" are only unmistakable clear if your camera (standpoint = "location")
is at a negative z position pointing towards positive z!
For beginners it's strongly recomanded to use a ground plane to make orientation in the threedimensional space easier!
A Change to a righthanded coordinate system basically is possible
(see my descriptions of right and left handed coordinate systems and the vectorproduct in
"Analytical Geometry with POV-Ray!)
Because of the necessary changes in many objects in the "Insert Menu" and
in the example files from the web, this is not recommended - at least for newbies!
|
About Floats and Vectors
|
Ordered groups of 2, 3, 4 or 5 floats (called "vectors") are written
in brackets separated by commas: "< , , >" .
For example, the point at x = 0.2, y = 3.35 and z = 1 is represented as <0.2,3.35,1>.
The coordinates are noted in the alphabetic order according to the
"left-hand-rule" <x,y,z> or in 2 dimensions: <u,v>!
Note: The following vectors are predefined in POV-Ray:
o=<0,0,0>, x=<1,0,0>, y=<0,1,0>, z=<0,0,1>, u=<1,0>, v=<0,1>.
|
Don't calculate! - POV-Ray can calculate by itself!
It is possible to describe values by arithmetic expressions, variables and formulas.
The basic arithmetic signs are: + , - , * , / and round brackets.
If a vector is connected with an arithmetic expression like "*" then the operation is applied
to every component of the vector: <0.5,1.0,3.5>*2 = < 0.5*2,1.0*2,3.5*2>
= <1.0,2.0,7.0>.
For the square root we use sqrt( ) and for π = 3.14.... we use pi.
Exponents: For A2 we write A*A or pow(A,2), for A3 we use pow(A,3).
Angles: For the transformation of an angle A form degrees to radiant value we have the function radians(A).
The functions sin(A) cos(A) tan(A) need the argument of the angle A in radiant value. With atan2(A,B)
you can calculate the arctan of A/B, this gives the value of the angle in radians. Changing a radians value R to a
degree value is possible by degrees(R).
With this and a lot of many other float, vector and string functions, also very advanced users can be very satisfied!
|
|