Home
- POV-Ray Tutorials
POV-Ray Introduction
Content - INDEX
>1. Working with POV-Ray:
"Insert Menu Add-on".
2. Basics on
How To Make a Scene.
3D Coordinates,
Floats and Vectors
3. Scene Structure
Basic example.
4. Scene File Header,
#include files,
camera, light_source.
5. Basic Geometric Objects
sphere, box, cylinder,
cone, torus, plane.
and other shapes
6. Transformations
Streching, Turning,
Moving and others.
CSG: union,
difference, intersection.
7. Colors on Surfaces
texture, pigment, normal, finish
8. #declare, #local, #macro,
placeholders + flexible objects.
9. #while Loops
Basic examples.
10. #include, include files,
re-usable objects.
11. Efficiency,
speed, flexibility,
modulare working
adapting from 3.1 to 3.5;3.6
adapting from 3.5;3.6 to 3.7
POV-Ray + Windows Vista.
- Insert Menu Add-on
& Download
|
Creating a Scene in POV-Ray:
|
Creating a scene with POV-Ray for Windows is easy to do with a minimal effort in writing.
For this we use the text templates from the "Insert Menu" of POV-Ray 3.7.
POV-Ray 3.6.2 : For users of POV-Ray version 3.6.2 it's recommended to use my improvement called
"Insert Menu Add-on for 3.6".
With this add-on creating POV-Ray scenes is much more comfortable and faster.
There is also a HTML version with the templates for use with 'cut and paste'
also for non-windows systems - see directory 'C:/Users/Documents/POV-Ray/v3.7/scenes/templates/_index.htm'.
You can get my "Insert Menu Add-on" (also HTML version, online or download) and other add-ons at the tutorial pages of our homepage:
www.f-lohmueller.de/pov_tut/pov__eng.htm
- see: "Download".
|
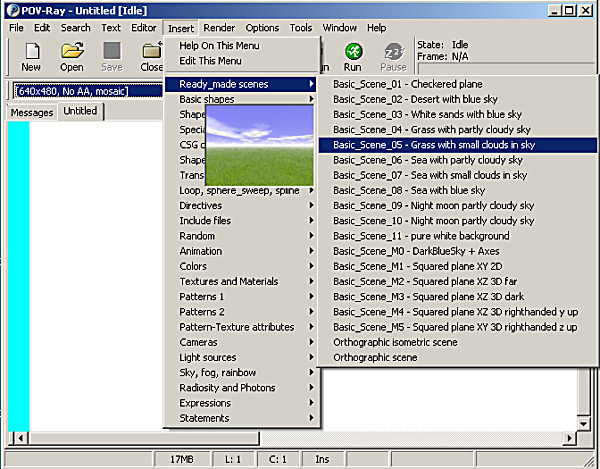
I Building a basic scene
|
We are making a new scene starting with a blank sheet of text, clicking the "New" button.
Then we choose "Insert" - "Basic templates" - "Ready_made scenes" a basic scenery
with camera, light source and background (Floor and sky):
|
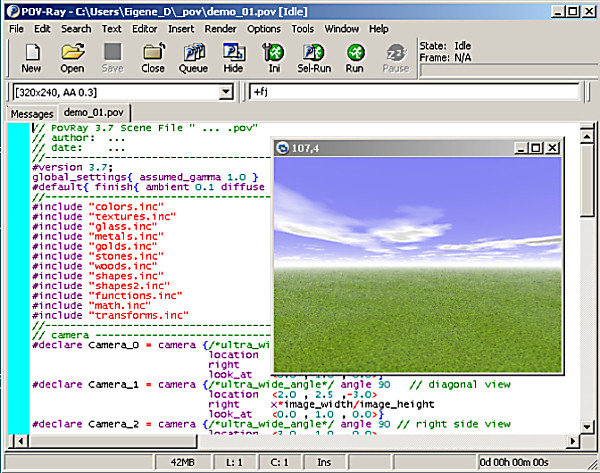
II Render Test of the basic scene
|
To get a first idea how the empty stage of our scenery looks like, we choose an appropriate resolution
in the resolution drop-down menu under the "New" button.
After this we save our scenery file with the "Save" button
- please don't use any non-ASCII characters, spaces or special signs except "_" in your file name (here: "demo1").
The extension ".pov" will be added automatically.
Clicking the "Run" button shows us the scene in a additional window,
called the "Render Window":
|
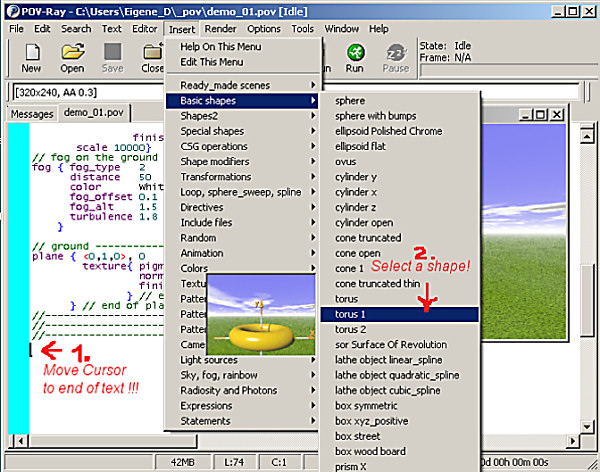
III Adding shapes to the scene
|
 Attention: Be careful before adding any other object:
You have to put the cursor at the very end of your text!
(Otherwise ... Some day you'll forget to do so and be in trouble! Hope you will remember this point! :-)
Then we select "Insert" - "Basic templates" - "Shapes with textures"
to add a simple basic shape to our scene:
|
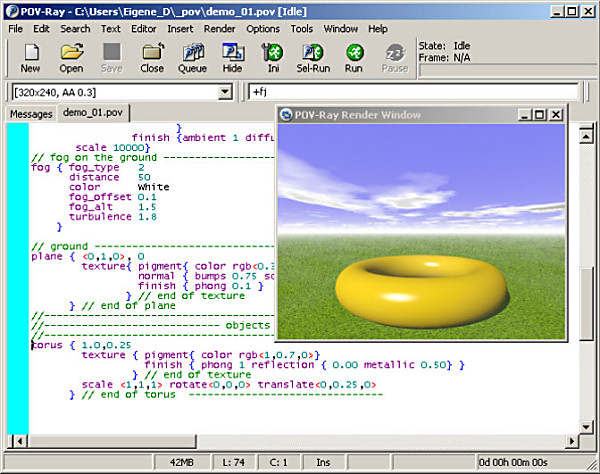
IV Render Test of the complete scene
|
To see our scene, we again click the "Run" button. This shows us the
new arrangement in the "Render Window":
|
V How to edit our scene file
|
To modify the scene text we have more tools than just inserting some templates from the "Insert Menu".
We can also do nearly all kind of text editing, which we know from modern text editors like i.e. "Word".
Some of the most important functions:
Ctrl + c copies a marked text section to copy memory space.
By Ctrl + v this text section will be inserted at the point indicated by the cursor.
This insert action we can also do by Ctrl + Insert.
This trap you will find at all text editors:
"My cursor eats the characters!" - (instead of inserting them!)
Normally (this is indicated by the sign "Ins" in the 4th lower gray sector) an editor program
inserts a character at the place indicated by the cursor. If we hit the "Insert" button once the
editor changes to overwrite modus
(this is indicated by the sign "Ovr" in the 4th lower gray field).
How to change back: Just hit the "Insert" button once again!
The important "undo function" is like by most programs Ctrl z:
This allows the user to undo all previous actions step by step.
The according counterpart is Ctrl y: called redo
Those commands are also available by "rigth mouse click, select undo/redo" or by selecting
them from the upper menu item "Edit".
|
VI Where is the image?
|
If you don't know where the renderered image's location is: Normally in the same directory like the scene file (.pov).
To change this: Click in your POV-Ray editor at "Tools",
"Edit master POV-Ray.INI":
Add a last line to this text file something like this:
"Output_File_Name=C:\User\POV-Ray_images\.
You can change this line to any existing directory you want.
But don't forget the backslash at the end, otherwise
all rendered images will be saved with the same name "images.bmp" - and your older images are overwritten.
|
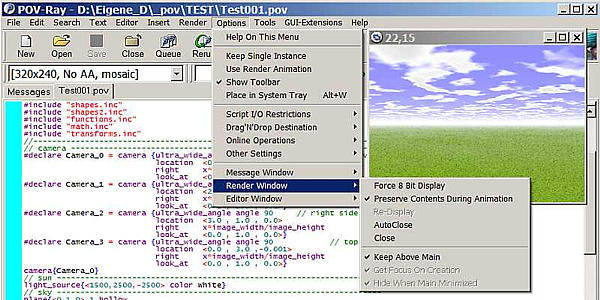
VII The Render Window is not visible or disappears immediately!
|
You will find a solution of this problem looking at the following image:
|
|