- POV-Ray Tutorials
- Analytical Geometry
with POV-Ray
- Index -
- Insert Menu Add-on
& Download
> Basics
Possibilities and Needs
Points & Lines
- Points in 3D
- Line Sections, Straight,
Vectors, Distance Markers
- Surfaces & Planes
- Output of Results,
Captions
- Points of Intersection
- Circles
Solids
- Tetrahedron
- Parallelepiped
- Round Solids
-
- Overview by Table
on "analytical_g.inc"
- Vector Analysis
with POV-Ray
- Righthanded & Lefthanded
Systems of Coordinates
and the Cross Product
- Samples from
Analytical Geometry
- Parallelogram of the
Middles of the Edges
- Trace Points of a Straight Line
- Calculations about a Triangle
- Area of a Parallelogram
and Cross Product
- Shadow of a Pyramid
- Hit a plane || yz-plane
- Angle of triangle & yz-plane
|
Analytical Geometry with POV-Ray
3D Visualization with Calculations and Output of the Results |
Basics |
|
|
An overview on what is possible and which preparations we have to make.
|
|
The Purpose and the Object:
Visualization of Geometrical Situations
in the Analytical Geometry in 3d representation
and Output of the Results of Calculations.
This tutorial and the appended files (scene template and include file)
were made to be used for
working in an optimal way in representing geometrical situations with POV-Ray for
1. an optical clear representation of results
2. the calculation of results.
This will be achieved in a very efficient way, with a minimum of prefabricated macros,
by an extensive use of components which already are available in POV-Ray.
This method of representation can also well used in teaching analytical geometry at school or university
The students does not need to know the complete how to of POV-Ray to come up to satisfying and
clearly illustrating graphical presentation.
The number of commands to understand for using of the program in teaching analytical geometry
can be learned easily during a few lessons also by students with lower performance.
About the Value of an Esthetic
and Clear Graphical Presentation.
The high value of an esthetic and clear graphical presentation can't be
emphasized strongly enough. The representation in color helps a lot to make clear every subject.
Even an only strictly rational thinking scientist (if something like this really exists!)
will be positively influenced by a also emotional attractive presentation - on the other hand
this absolutely does not have a negative effect! : -) .
an esthetic and clear graphical presentation helps not only in learning but it helps also
in convincing while publishing scientific results.
The high esthetic attraction of representations Darstellungen with POV-Ray and the clear
comprehensibility can fill with enthusiasm for mathematics also people without any affinity to this subject.
Last but not least: mathematics is closely related with art and esthetics and every
correct solution of a mathematical problem is also an esthetic solution!
The Preparations to Make
In the following the prepartions to make are explained:
1) Using the Include file "analytical_g.inc"
My special Toolbox of Analytical Geometry must be included,
this means: this file must be copied either in the same directory like the scene file
(".pov") or in the directory "Include" in our POV-Ray program directory.
2) Template scene file with system of coodinates
For bulding your own scenes use the following
scene file template "a_geo_00.pov"
or the
text file template "a_geo_00.txt" .
The text of this file contains a simple basic scene with light source, camera, coordinate axes on squared
ground and a set of samles for colors.
Attention:
We have to add our own objects only at the end of the template text!
|
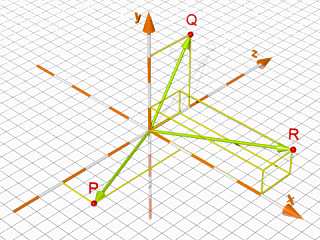
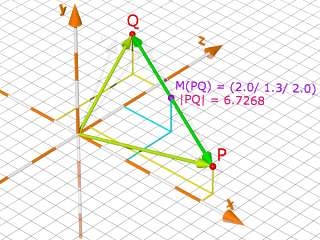
Representation of points in the 3d space
Results of calculations with POV-Ray.
Additional hint:
We can change both the position of the camera and the position of the light.
The length of the axes also can be changed.
To change form the lefthanded to righthanded coordinates see:
Lefthanded to Righthanded Systems of Coordinates.
If we rotate the ground plane by "plane{<0,1,0>,0 ... rotate<-90,0,0>}
and if we reduce the length of the z axis to zero, we can use the base scenery also
for simple 2d geometry in the xy plane! We only have to set all z components constantly to zero!
3) Defining textures and line intensitiy!
Textures and the width of lines are predefined in the template scene file!
Switching off the casting of shadows:
We can switch off the casting of shadows for each single object as follows:
We add right before the last brace of the object the command "no_shadow".
Sample: cylinder{ P1, P2, pigment{ color Green } no_shadow}
For the colors to use see my table of simple colors Overview by Table !!!
4) Defining Points and Vectors
For an effective use we should define variables for all points and vectors we want to use.
This is makes it easy to arrange our scene text file with our
objects clearly arranged and easy to handle.
Attention:
Don't use national non-ASCII letters for variables or file names!!!
Special Attention:
POV-Ray has predefined expression for special vectors i.e.: o = <0,0,0> the center of the world!
For more see here: Vector Analysis with POV-Ray!!!
|
|